  |
||
|
|
|
First login into your control panel. Your control panel is located at http://www.yourdomain.com/cpanel/ (change 'yourdomain.com' to your domain name). When you login you will see the following screen. Click on the 'File Manager' icon (highlighted in red).
After you click on the icon another browser window will open looking similar to this screen.
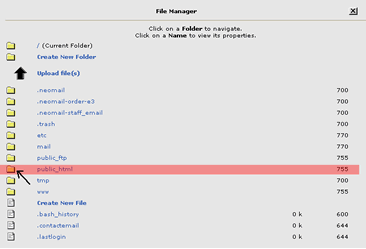
URGENT NOTICE: You will see a lot of folders. Some like these and some others. If you mess around with the wrong folders you can destroy your e-mail, your frontpage extensions and more. You must be careful in what you are doing. The folder you are most interested in will probably be the "public_html" folder. This is where your web pages are and where everyone goes to see your hosting account. To access a folder you must click on the folder icon, not the name. If you click on the name you will bring up a description of the item in the upper right hand corner of the screen. To add or manage your webpages click on the folder icon next to the "public_html" words. (The black arrow is pointing to where you should click). After clicking on the icon you should see the following screen.
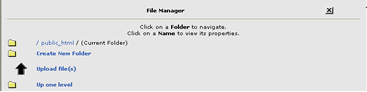
At this screen you will see a listing of all of the files in this directory. The screen shot above does not show the entire directory but is going to show you a few things. If you click on the "Create New Folder" words or icon in the upper right hand corner will appear a text box where you can enter the name of the new directory. Enter the name of the new directory and press the "Create" button and a new folder will appear. IIf you click on the "Up one level" you will be taken back one directory. So if you are in the "public_html" directory and click "Up one level" you will be taken back to the screen showing all of the folders. (The image on the page above this image with the red line). The "Up one level" will only back up one directory at a time.
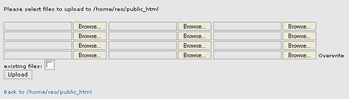
Upload Files To add a file to the current directory press the "Upload file(s)" or the big black arrow. This will bring up the following screen.
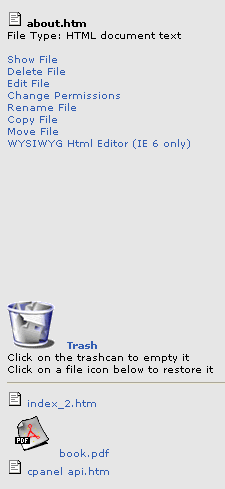
Delete Files To delete a file click on
the name of the file. This will bring up the following screen in the upper right
corner of the screen.
To delete a file click the "Delete File" text. This will send the file to the Trash can. You will be able to see the contents of the Trash can below the text you just clicked. If you click on the Trash can you will delete all the files in the Trash can. If you decide you want to replace the file (or undelete it) click on the file name in the Trash can. Note: If you empty the Trash can you cannot undelete any files.
Copy Files/Move Files To copy a file follow these simple instructions. Click on the file name you want to transfer. Then in the upper right hand corner click on the words "Copy File". Then you will see a list of folders. Simply click on the folder where you wish to copy the file. You can also move files using the same process but clicking on "Move File" rather than "Copy File".
Other Abilities There are also some other
things you can do with the files. You can edit files online, change the
permissions of folders and files (CHMOD), and rename files and folders. To do
these functions simply click on the file or folder you want to change and then
in the upper right corner select what you want to do.
|